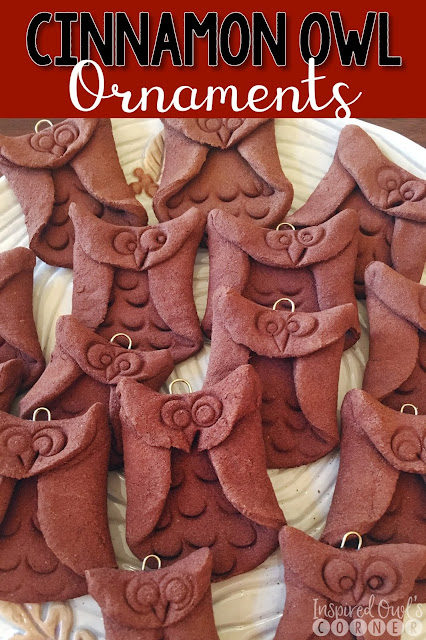
For the past three years my class has made owl ornaments for their parents' Christmas gifts. They always turn out perfectly and the parents love them. I have to admit, though, I always panic a little beforehand that the dough will be too sticky or the kiddos will have difficulty making them, because I forget how easy they are to make! I've tried two different versions of dough, and this one from Tracey of The Kitchen is My Playground is my favorite. I followed her recipe for making a class set of 30, 3-inch circles: 
48 oz. applesauce
24 oz. cinnamon
1/3 cup white glue
I love this dough because it's so easy to work with. (You can read through her blog post for more information). I used a mason jar lid that was 3-1/2 inches in diameter to cut the circles, and I had plenty of dough for all of my students. Below are my steps for making the owls. You can also refer to this post to see the original directions.
Cinnamon Owl Ornaments
Here are the steps I followed:
1. After thoroughly mixing and kneading the dough, I rolled it out and sprinkled some cinnamon onto the waxed paper to keep the dough from sticking. Next, I cut the circles using a Mason jar lid. I also used biscuit cutters to make different sizes with the leftover dough. 
2. I had my students come to the table, six at a time, to work on the ornaments. Each of them had a circle of dough and a piece of waxed paper to work on. I had the students add indentations for feathers with the cap of a Crayola Marker by pushing into the dough at a slant. 
3. We folded the left side over to make a wing. We did the same to the other side to make the wing on the right side, then we folded the head down. 
4. We added eyes with the end of the Crayola Marker, and for the inside of the eyes, we used the end of the skinny Crayola Marker. (I didn't have one of the skinny markers at home when I snapped these pictures, so I used a straw, and I actually like how those came out too!) You can experiment with different sizes of markers, pens, or anything else that would make a circle for the eyes. I showed my students how they could make different sized eyes and change the look of their owls based on the placement of the pupils. I gave the students plastic knives to make the v-shape for the beak, but here I used a steak knife. Some of my students wanted to add extra details to their owls, and I told them to go for it!
5. I broke small paper clips in half by bending them back and forth to use as hooks and stuck them into the tops of the owls before putting them in the oven to dry.
6. You can bake them for 2-3 hours at 200 degrees, or you can leave them out to dry on a drying rack for 3-4 days, flipping over once per day. I like to leave them out for a few days in addition to baking them, before wrapping them.
Something else I always do after the ornaments are dry is secure the hooks with a drop of glue, since they tend to slip out. This glue really keeps them adhered. I just pull out the hook, put a drop of the glue onto the top of each hole, and push the hook back into the holes so the glue spreads down into the hole. It's also great to use if you want to make the owls into magnets instead of ornaments. Just add some of the glue to the backside of a magnet, adhere to the ornament, and you've got an owl magnet instead of an ornament! 

Be sure to let them dry thoroughly before adding ribbon and packaging them up. 
Here are our finished ornaments. Just add festive ribbon or ornament hooks and you are all set! 
Cinnamon Owl Ornaments
If you make these ornaments, I'm sure you will love the results. Have a great week! I have a short week, then I will be on a two day shopping frenzy to finish up Christmas! :) 
Pin This Post to Save and Share
Cinnamon Owl Ornaments

SaveSave
SaveSaveSaveSave
Some TpT friends and I have come together to bring you Daily Deals on TpT from December 5th-16th! Just be sure to enter the correct hashtag each day in the TpT search bar to find all of the deals for that day. 
Below are all of my deals for the week!
I hope you find some steals! 
Have great week! :)

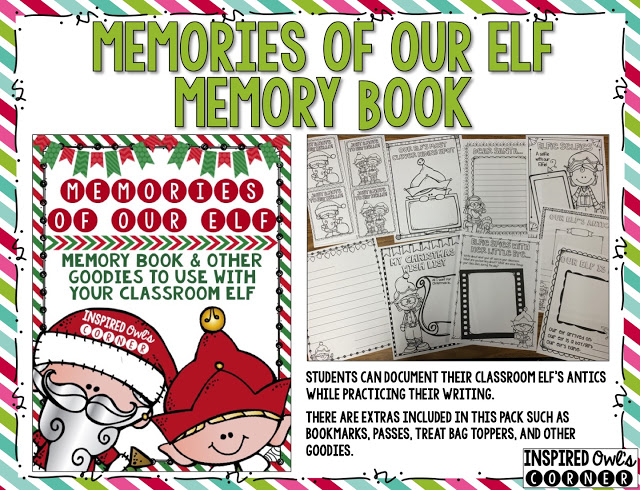
For the fifth year in a row, my class will be visited by an elf from The North Pole. Having an elf has added to the magic of the holiday season in my classroom. This year we are documenting our elf's arrival, his daily antics, and other happenings in our classroom in a memory book format. My students need so much extra practice with writing, so the pages give them the opportunity to practice writing in a fun way. These pages make a great keepsake for the students and their families to reflect on. 
You can also find posters, bookmarks, passes, treat bag toppers, candy bar wrappers, Magic Reindeer Food printables, We've Been Elfed directions and posters, elf yourself art project, Santa's Nice List, and letters from Santa and your elf. 
Last year Santa included all of the masters for the printables inside the box our elf arrived in, so all I had to do was print what we needed. 
 
 
Does an elf visit your classroom? What activities do you do with it in your classroom?
Enjoy the rest of your week! :)
Today I'm linking up with Carla from Comprehension Connections to share with you one of my favorite mentor texts  to read with my class during the holidays, Memoirs of an Elf.
The book Memoirs of an Elf  is written by Devin Scillian. You may know him as the author of Memoirs of Goldfish and Memoirs of a Hamster. If you have a class elf that visits your classroom, it would be fun to have your elf bring this book as a gift from the North Pole for your students!
I adore this book! The story is told through the eyes of one of the elves, and it details Santa's delivery of presents around the world on Christmas Eve. Santa returns home to the North Pole on time, but one of the elves discovers that a family's beloved dog accidentally jumped into Santa's toy bag! The problem in the story is how to return the puppy to its worried owners without being spotted, since by now it's daytime. Momma Claus saves the day with her idea, and Tugboat is delivered to his grateful owners.  
Not only is this an adorable holiday story, it's full of teachable moments. It's the perfect mentor text! Through this book, I am able to teach or review compound words, sequence of events, story structure, problem/solution, fact and opinion, cause and effect, and figurative language such as simile, metaphor, idioms. This is also a perfect mentor to introduce personal narrative. This year I also plan to add some geography by giving students a map and having them track the different locations mentioned while Santa delivers the presents. I also love the "Little Known Facts" about Santa. It would be fun for students to keep a list of facts about Santa, and lead into a discussion of fact and opinion. 
I have trained my students to be on the lookout for what they notice while reading. We discuss the special techniques authors use that appeal to us, and my students are encouraged to "borrow' the techniques to improve their own writing. Simile and metaphor can be challenging to teach, because students must be able to understand them in context. Providing students with practice will help them to recognize their meanings as well as differentiate between the two forms of figurative language. Hopefully my students will add them to improve their writing after practicing them. 

I begin teaching simile and metaphor by going over each form of figurative language using the posters I've included in my freebie above. I post an anchor chart with an example of each, and we continue our discussion of them. I ask students to become "detectives" and search for similes and metaphors in Memoirs of an Elf. We post the sentences on the anchor chart, and refer to it during our study.  
Next, I have students use the simile and metaphor sheet the girl is holding in the graphic above. Students are assigned a simile or metaphor from the set of task cards, and draw a picture to represent it, and what they think the meaning is.  After students have completed all of their simile and metaphor sheets, I bring them together and they present their findings. We discuss each one, what the meaning of the simile or metaphor is, and the clues that led us to believe that. We sort each card under the correct category in a pocket chart. After this discussion, students are ready to write their own similes and metaphors to practice. I have them trade with a classmate to determine whether they are similes or metaphors, as well as their meanings. You could use the same printable they used in the activity above. 
The activities I've shared are part of this larger pack: Holiday Reading and Writing Graphic Organizers Pack. It includes many Memoirs of an Elf activities such as sequencing, story structure, and vocabulary graphic organizers, compound word activities, idioms, and a variety of other printables and graphic organizers that can be used with any book. The graphic organizers are easy to prep and great to just grab and go. They really help my students to dig in deeper during our read alouds. They are also perfect for extra practice and/or assessment!
You can grab my freebie HERE. I hope you and your kiddos find it helpful! :)

Hello Friends! It's been a crazy few weeks with Red Ribbon Week, Halloween, testing, conferences, and on top of it all, next week is Thanksgiving! I know you can relate all too well. I wanted to quickly pop in and share what I'm planning to give my parent volunteers next week for Thanksgiving.
I love spoiling my parent volunteers during the holidays. One of my favorite things to give them at Thanksgiving is a Thanks a Latte card with a coffee gift card attached and Bath and Bodyworks hand soap as a thank you for all they do for my students. This gift would also be perfect as a thank you for your colleagues. You can click on the picture above to download your own set if you want to make them. I will be making a Christmas set soon!
Enjoy the rest of your week! :)
Last year I struggled with beginning my Daily 3 rotations. It was my first year in second grade, and I didn't realize how much LESS independent second graders were than third graders. When I finally began my Daily 3 routine, I knew I wanted to have engaging, relevant activities for my students to work on independently while I taught my small groups. After some trial and error, I learned a few things along the way that I wanted to share with you today. 
One important thing I learned early on was to have different choices available for different learners- but not so many that it overwhelmed them. If I set out too many activities or gave them too many choices, my students spent half the time choosing what they were going to work on instead of actually working on their word work. Another important thing I needed to remember was to rotate the activities often, so my students didn't get bored with the same activities. This also kept them excited about what new activity they could expect to work on during word work.

Appealing to different learning types was another important thing to remember. I added Spelling City, which is free to use, and I was excited to learn that Spelling City already had our spelling words on their site so I could easily import them and have my students practice them each week. Including tactile activities, writing, artistic, and computer based activities makes it fun and engaging for your students. 

My students oohed and aahed when I shared Play Doh Spelling with them! I had a station set up with baggies filled with stamps and little party-size packs of Play-Doh that I bought at target. They grabbed a baggie, a mat, and a recording sheet and they were good to go. After stamping each word, they wrote them on their recording sheets. They love this one!
Below is a new activity that I introduced this year. I searched high and low for the Macaroni and Cheese letters, and finally I spotted them at Target!  Students spell each word with the letters and copy them onto their bowl, which they can decorate as well. They can also trace each word a few times with a different color to practice their words. To incorporate more writing, sometimes I have them write about their favorite lunch using their spelling words or create fun lunchroom rules using their words on the back of their bowl paper. You can grab this freebie by clicking on either picture below. If you can't find the macaroni, you can print out the letters I included in the freebie.
Below is another favorite of my students! They think it's magic when I tell them to write their spelling words in white crayon, then color their picture with marker- they never believe they will be able to see their spelling word appear! I also have my students draw a ghost on the backside and write their words a second time. They can even trace over the words they've already written with a crayon. You can grab the freebie by clicking on the picture below. 
I hope you found some useful ideas that you can add to your word work stations! If you would like to see more, you can check out the entire pack HERE. Have a wonderful week!

SaveSave
SaveSave
I wanted to pop in quickly and share another vocabulary idea with you. This one is a hit with my kiddos! I call it Swat That Vocab Word. I post our vocabulary words in a pocket chart on our front board. I pick sticks and choose two students at a time to come up front to participate. Each student holds a (clean) flyswatter. I either say a definition, a synonym, an antonym, or I give a sentence clue. I give the students a few seconds, then I say "swat!" and the student who swats first has to use the word correctly in a sentence that relates to the story we are reading. The students go crazy over this simple vocabulary practice! You can use this same method to practice almost anything! 
If you would like to try Swat That Vocab Word in your classroom, click on the image below!
You can check out Magic Hat Vocab by clicking on the image below in case you missed it. It's another favorite game we play to practice using our vocab words!
If you use it, I hope your kiddos have as much fun with these games as mine do!

Last year, a wonderful grandmother of one of my students offered to buy all of the supplies and come teach my class how to make this amazing fall decor project. I took her up on her offer, and my students and I were delighted with the outcome of our beautiful pumpkins! To make 24 of these pumpkins she purchased:

  • 50 feet of of vinyl hose 
  • orange acrylic paint (we used 4-8 oz. bottles)
  • small paper bags or brown construction paper for stems
  • leaves and berries from the Dollar Store (or any craft store)
  • paint brushes
  • styrofoam plates
To start, she cut the hose into 2 foot sections and stapled them with a box stapler, but a regular stapler will work as well. Then she cut the small paper bags in half and twisted them into stems (see photos below). 

Next, she cut the leaves and berries for each pumpkin and saved them to add after the pumpkins were painted and dry. She mentioned that she ironed some of the leaves on a low setting that were badly wrinkled. 
The students were given a pumpkin on a styrofoam plate and we called them to my back tables in groups to paint them. We stuck a piece of newspaper rolled up in the middle of each pumpkin so the students had something to hold on to while painting. The tables were also covered with newspaper. 
Some of them were in a hurry and left some white patches.  We had to encourage them to cover the entire surface with paint. 
After the students were finished, we pulled out the newspaper handles and stuck in the paper bag stems once they were dry. 
We also added the leaves and berries, which made a nice finishing touch. I sent the students home with their pumpkins on a clean styrofoam plate and bagged them up. Their families loved them and were able to enjoy them throughout November!
Overall, this was a fun, easy, fall project that the kids loved.
I remember when I was in fifth grade and my favorite teacher handed us a beautifully bound scrapbook of our memories from the year. As I looked through mine, I realized it was a keepsake of the pages I'd written the entire year. We didn't know that our teacher was saving the pages we wrote throughout the year about our memorable events, field trips, holidays, and what we were learning in class. 

Last year I decided to introduce something similar to my class. My students created memory books that they also worked on the entire year. They documented experiences such as their first day of school, highlights of each month, our Fall Festival, their birthdays,  and our field trips. I began to see students who were struggling with writing become successful and actually enjoying it. 

As my students finished each page, I collected and organized them inside of a plastic file crate similar to the one below. At the end of the year, it was easy for my parent volunteers to make sure each book was in the proper order so I could quickly bind them with my school's binding machine and pass them out on the second to the last day. 
The students who didn't purchase a school yearbook last year were able to have their friends sign their memory books on the autograph pages. My students and their parents loved the finished products! 
I asked the students to only use crayons or colored pencils on their pages, and to try to keep that consistent throughout the year. They really wanted to use markers, but I found they were too overpowering and didn't look as nice as the colored pencils or crayons. 

Would you like to try a free sample for October? You can grab this freebie HERE. I hope you and your kiddos enjoy it if you can use it! :)
And you can grab the cover to the file case above by clicking HERE

Have a wonderful Sunday and rest of the week! I am off to Disneyland on Tuesday for Fall Break! :)
Welcome to the October edition of Pick 3! Every month when I sit down to write my Pick 3 post, I'm in shock that another month has flown by! Soon the holidays will be upon us, along with the whirlwind that it entails. If only we could slow down time somehow!
I can always depend on the bloggers in this link-up to share new and amazing ideas and activities to enrich my students' learning experience in my classroom. I hope you are able to find some great new ideas to use in your classroom too!
I love the PAWSitive Planner guides from Lisa! They are filled to the brim with fun thematic book, video, and lesson ideas to help you easily plan an amazing unit! This one is all about fire safety, which is the first week of October- this week! I love how she has done all of the planning for us! She has several others that you can find at the top of her post HERE. Check out the one on pumpkins too- it's amazing! 
(Click on Photo Above to See Original Pin)
These Rice Krispy Treat monsters are adorable! To save time, you could buy the ones in the package, but I would probably make them myself- they taste better! These would be perfect for a classroom party. I might make a batch and stick them inside goody bags for the kiddos to take home. I also plan to make these for my girls' Halloween party- they would look adorable sitting out on a platter!
(Click on Photo Above to See Original Pin)
These story book inspired pumpkins would be so fun for the students to do! Next week is our Fall Break, so I might send this home as an optional project with my students. Those who want to make a story book character can, but I won't make it mandatory for those students who won't be around and don't want to participate. How cute would they look decorating the classroom though?
(Click on Photo Above to See Original Pin)

Be sure to visit the other bloggers participating in our link-up for more great ideas! I hope you find some fabulous ideas to pin! 

This linky is hosted on the third of each month. We would love for you to join us! 
1.  Save the Pick 3 images to your desktop.
2.  Create a blog post using these images to share you 3    
     Pinterest Picks for the month.
3.  Share a link to your full Pinterest page if you would like.
4.  Link up by clicking the "add your link" button below.
5.  Be sure to check out the other Pinterest finds that have 
     been shared and leave a comments on the ones you love!


Back to Top